Friday, August 31, 2012

Reading and processing video frames with Java


The class VideoSource loads a video file and offers access to the individual frames.

To use this class you need to have JMF installed on your machine. The video format must be supported by your Java/JMF platform. Best is to use no codec at all; "raw" video.

The usage is as follows:

VideoSource vs = new VideoSource("file://c:\test.avi");
vs.initialize();
...
int frameIndex = 12345; // any frame
BufferedImage frame = vs.getFrame(frameIndex);

package popscan; 
import java.awt.Graphics2D
import java.awt.Image
import java.awt.image.BufferedImage
import java.net.URL
import javax.media.Buffer
import javax.media.ControllerEvent
import javax.media.ControllerListener
import javax.media.Manager
import javax.media.Player
import javax.media.PrefetchCompleteEvent
import javax.media.RealizeCompleteEvent
import javax.media.control.FrameGrabbingControl
import javax.media.control.FramePositioningControl
import javax.media.format.VideoFormat
import javax.media.util.BufferToImage
public class VideoSource implements ControllerListener { 
public static final int NOT_READY = 1; 
public static final int READY = 2; 
public static final int ERROR = 3; 
Player _player; 
String _videoFilename; 
FramePositioningControl _framePositioningControl; 
FrameGrabbingControl _frameGrabbingControl; 
private int _state; 
// the filename must contain protocol,  
//for example file://c:\\test.avi 
public VideoSource(String videoFilename) { 
    _videoFilename = videoFilename; 
    _state = NOT_READY
} 
/* 
 * Create Player object and start realizing it 
 */ 
public void initialize() { 
    try { 
        _player = Manager.createPlayer(new URL(_videoFilename))
        _player.addControllerListener(this)
        // realize call will launch a chain of events,  
        // see controllerUpdate() 
        _player.realize()
    } catch (Exception e) { 
        System.out.println("Could not create VideoSource!")
        e.printStackTrace()
        setState(ERROR)
        return
    } 
} 
/* 
 * Returns the current state 
 */ 
public int getState() { 
    return _state; 
} 
/* 
 * Returns the number of frames for current video if  
 * the VideoSource is ready, in any other case returns -1. 
 */ 
public int getFrameCount() { 
    if (getState()!=READY) { 
        return  -1; 
    } 
    return  _framePositioningControl. 
            mapTimeToFrame(_player.getDuration())
} 
/* 
 * Returns the video frame from given index as BufferedImage.  
 * If VideoSource is not ready or index is out of bounds, 
 *  returns null. 
 */ 
public BufferedImage getFrame(int index) { 
    if (getState()!=READY||index<0||index>getFrameCount()) { 
        return null; 
    } 
    _framePositioningControl.seek(index)
    Buffer buffer = _frameGrabbingControl.grabFrame()
    Image img = new BufferToImage((VideoFormat)buffer. 
            getFormat()).createImage(buffer)
    // image creation may also fail! 
    if (img!=null) { 
        BufferedImage bi = new BufferedImage(img.getWidth(null),  
                img.getHeight(null)BufferedImage.TYPE_INT_ARGB)
        Graphics2D g = bi.createGraphics()
        g.drawImage(img, 0,0, null)
        return bi; 
    } 
    return null; 
} 
     
// callback for ControllerListener 
public void controllerUpdate(ControllerEvent event) { 
    if (event instanceof RealizeCompleteEvent) { 
        _player.prefetch()
    } else if (event instanceof PrefetchCompleteEvent) { 
        // get controls 
        _framePositioningControl = (FramePositioningControl)_player. 
          getControl("javax.media.control.FramePositioningControl")
        if (_framePositioningControl==null) { 
            System.out.println("ErrorFramePositioningControl!")
            setState(ERROR)
            return
        } 
        _frameGrabbingControl = (FrameGrabbingControl)_player. 
            getControl("javax.media.control.FrameGrabbingControl")
        if (_frameGrabbingControl==null) { 
            System.out.println("ErrorFrameGrabbingControl!")
            setState(ERROR)
            return
        }             
        setState(READY)
    } 
} 
// for setting the state internally 
private void setState(int nextState) { 
    _state = nextState; 
} 
     
} 

And here is a tester class to demonstrate how the VideoSource works.


It creates an AWT Frame and draws the video frames one by one as fast as possible to the Frame's Graphics surface.

First it draws the frames from the first frame to the last frame and when the loop ends, the frames are drawn from the last frame to first frame. This is to show that you really can access the individual frames.

In this case the frames to be drawn are next to each other, so if you are accessing the frames randomly, you may encounter some performance issues.

package popscan; 
import java.awt.Frame
import java.awt.image.BufferedImage
public class TestFrame { 
public static void main(String[] args) { 
    VideoSource videoSource = new VideoSource(args[0])
    videoSource.initialize()
    while (videoSource.getState()==VideoSource.NOT_READY) { 
        try { Thread.sleep(100)} catch (Exception e) { } 
    } 
    if (videoSource.getState()==VideoSource.ERROR) { 
        System.out.println("Error while initing"+args[0])
        return
    } 
    Frame frame = new Frame()
    frame.setVisible(true)
    int frameCount = videoSource.getFrameCount()
    // forward 
    for (int frameIndex=0;frameIndex<frameCount;frameIndex++) { 
        BufferedImage i = videoSource.getFrame(frameIndex)
        // do what ever you need to do your frame 
        drawFrame(frame,i,frameIndex)
    } 
    // backwards 
    for (int frameIndex=frameCount;frameIndex>=0;frameIndex--) { 
        BufferedImage i = videoSource.getFrame(frameIndex)
        // do what ever you need to do your frame 
        drawFrame(frame,i,frameIndex)
    } 
    System.exit(0)
} 
public static void drawFrame(Frame frame, BufferedImage image,  
        int index) { 
    if (image!=null) { 
        frame.setSize(image.getWidth(), image.getWidth())
        frame.getGraphics().drawImage(image, 0, 0, null)
        System.out.println("Image at index: "+index)
    } else { 
        System.out.println("null image")
    } 
     
} 
} 

Monday, August 27, 2012

How to browse internet with wifi only in Nokia Asha 306

I just bought a Nokia Asha 306 mobile phone to one of my younger family members. Asha 306 is a nice looking touch screen phone with very friendly price (79 euros).

Very soon I was getting frustrated with it, because I could not start browsing internet without enabling mobile data connection (GPRS).

I spent two evenings frantically setting different kind of option/configuration variations with no luck. Finally, by typing the correct keywords to Google, I stumbled to Nokia forum where one poster had found out the correct settings to achieve browsing with wifi, without enabling mobile data connection.

See the original post here: http://discussions.nokia.com/t5/Software-Updates/Asha-302-Software-issue-told-by-nokia-care-Wifi-is-not-working/td-p/1349321

Apparently the instructions are valid for Nokia Asha 302, Nokia Asha 305, Nokia Asha 306 and most likely with Nokia Asha 311 too.

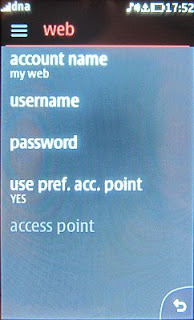
Edit 2013-03-30 added screenshots:

1. Select "settings"
2. Select "configuration"

3. Select "web"


4. You can change to configuration name if you like

5. Go back and long press the menu button, then choose "activate".


6. Set the Menu > Settings > Connectivity > Net Connection to "Ask first". Next time you open your browser it will ask you the connection to use.

Wednesday, August 22, 2012

Eclipse Indigo update problem solved

I have been using Eclipse happily for years, but lately it has been a nightmare for me to update anything, including PHP support and Android SDKs. Surely, I just changed my laptop from 32-bit XP to 64-bit Windows 7, but that should not be a problem to Eclipse and update servers.

The update process hangs up very early in the update process, for example at  "Fetching children of Indigo: 13%" or "Fetching content.jar: 3%" and stays there forever (until timeout). I tried to change the update servers, tried to change the protocols and finally udpated the Eclipse version from Indigo to Juno. I also tried to run the Eclipse versions as an administrator, but the same freezing occurred.

As the same update problems were still occurring with Eclipse Juno, I came to conclusion that it is related to my computer and network setup.

After some thinking, I finally turned off my antivirus program (AVG) . After disabling the AVG temporarily, the Eclipse update feature started to work again!

So, if you are experiencing very slow response when trying to update Eclipse, try to turn down your antivirus software.

Sunday, August 19, 2012

Skin detection in digital images

Face detection has been quite "hot" topic lately. Perhaps one reason is that
modern computers are now powerful enough to process sequential video frames
in real time.

There are many techniques for face detection, one approach is to first classify the pixels to be "skin" or "not skin" pixels. When the "skin" pixels have been found, the noise is removed and pixels are combined to create larger groups. If we are lucky one or more of this kind of pixel groups are part of a face. The pixel group(s) can then be inputted to a face detection algorithm, which makes the final detection for eyes, nose and mouth etc.

Pixel based operations needed for skin color detection are simple, and that is what makes the skin color techniques so attractive.

The skin color seems to be quite easy to spot, "just choose pixels which loosely matches skin color". But actually the problem is more difficult than it first seems. The skin color varies from dark to light and is heavily influenced by lightning.

The lightning conditions can make person's skin color completely different. The lightning color can be yellow, blue or white, and the image can be taken with or without a flash. There can be distracting highlights on skin of the face or the background can contain similar colors as skin.

As many other algorithms, also my algorithm expects images to be shot in normal daylight, without excessive higlights or shadows.

To actually detect a face, there must be some assumptions about the image. The face must be in the image and there should be as little as possible other exposed skin in the image. Suitable images are, for example, images that are coming from the laptop webcams.

To maximize the detection of skin colored pixels, many have proposed to use several detection mechanisms and then combining the results. I am here doing the same thing. In the following, I am presenting three methods for detecting pixels with skin color; using RGB-space, YCrCb-space and HSI-space. 

Note: I am not attaching the full source code here. If there is a huge demand for that, I can do it later on... 

Example images

Here you can see some of the test images downloaded from The USC-SIPI Image Database (http://sipi.usc.edu/database/) and from Kodak (http://r0k.us/graphics/kodak/).

I have ran the skin detection algorithm described below, and the pixels that the algorithm "guesses" to be skin are highlighted with red color.


Skin color cluster in RGB color space

Skin color cluster in RGB color space (R,G,B) is classified as skin if [1]:
R > 95 and G > 40 and B > 20 and
max{R,G,B}-min{R,G,B} > 15 and 
|R-G| > 15 and R > G and R > B

This can be written to a Java function:
// We are assuming here that most pixels in the random image
// are non-skin pixels. So let's try to get out of the function
// as fast as possible to avoid slowest operations, min and max.
public boolean isSkinRGB(int r, int g, int b) {
    // first easiest comparisons
    if ( (r<95) | (g<40) | (b<20) | (r<g) | (r<b) ) {
        return false; // no match, stop function here
    }
    int d = r-g;
    if ( -15<d && d<15) {
        return false; // no match, stop function here
    }
    // we have left most time consuming operation last
    // hopefully most of the time we are not reaching this point
    int max = max(r,g,b);
    int min = min(r,g,b);
    if ((max-min)<15) {
        // this is the worst case
        return false; // no match, stop function 
    }
    // all comparisons passed
    return true;
}

Skin color cluster in YCrCb color space 

First we need to convert RGB color values to YCrCb color values.

To convert RGB color values to YCrCb color values we can use following formula [5]:
Y  = (0.257*R) + (0.504*G) + (0.098*B) + 16 
Cr = (0.439*R) - (0.368*G) - (0.071*B) + 128
Cb = -(0.148*R)- (0.291*G) + (0.439*B) + 128

Using these values we can classify (Y,Cr,Cb) as skin if [3]:
Cr <= 1.5862 × Cb + 20 AND
Cr <= 0.3448 × Cb + 76.2069 AND
Cr <= -4.5652 × Cb + 234.5652 AND
Cr >= -1.15 × Cb + 301.75 AND
Cr >= -2.2857 × Cb + 432.85 AND

This can be written to a Java function:
class YCrCb {
    double Y = 0.0;
    double Cr = 0.0;
    double Cb = 0.0;
    
    public static YCrCb RGB2YCbCr(double R, double G, double B) {
        YCrCb result = new YCrCb();
        result.Y  = (0.257*R) + (0.504*G) + (0.098*B) + 16; 
        result.Cr = (0.439*R) - (0.368*G) - (0.071*B) + 128;
        result.Cb = -(0.148*R)- (0.291*G) + (0.439*B) + 128;
        return result;
    }
}

// Like in RGB case, let's get out of the function as
// fast as possible to avoid unnecessary multiplications. 
public static boolean isSkinYCbCr(double r, double g, double b) {
    YCrCb result = YCrCb.RGB2YCbCr(r, g, b);
    double cr = result.Cr;
    double cb = result.Cb;
    if (cr >= ((1.5862*cb) + 20)) {
        return false;
    }
    if (cr <= ((0.3448*cb) + 76.2069)) {
        return false;
    }
    if (cr <= ((-4.5652*cb) + 234.5652)) {
        return false;
    }
    if (cr >= ((-1.15*cb) + 301.75)) {
        return false;
    }
    if (cr >= ((-2.2857*cb) + 432.85)) {
        return false;
    }
    // all comparisons passed
    return true;
}

Skin color cluster in HSI color space 

For calculating HSI color values, we can use following method [4]:

First we need to normalize (R,G,B):
r = R / R + G + B
g = G / R + G + B
b = B / R + G + B

Then we can use the values:
h = cos^-1((R-G)+(R-B)/2*sqrt((R-G)^2+(R-B)(G-B)))
s = 1-3*min(r,g,b) : 0 <= s <= 1
i = (R + G + B) / (3*255) : 0 <= i <= 1
h = 360 - h, if (B>G) 

This can be written in Java like this:
class HSI {
    double h = 0.0;
    double s = 0.0;
    double i = 0.0;

    public HSI RGB2HSI(int R, int G, int B) {
        HSI result = new HSI();
        result.i = (R+G+B)/3.0;    // we have calculated I!
        if (R==G&&G==B) {
            return result;    // return result with h=0.0 and s=0.0
        }
        double r = R/i;            // normalize R
        double g = G/i;            // normalize G
        double b = B/i;            // normalize B
        double w = 0.5*(R-G+R-B) / Math.sqrt((R-G)*(R-G)+(R-B)*(G-B));
        if (w>1) W = 1.0;       // clip input for acos to -1 <= w <= 1
        if (w<-1) W = -1.0;     // clip input for acos to -1 <= w <= 1
        result.h = Math.acos(w);   // the value is 0 <= h <= Math.PI
        if (B>G) {
            result.h = 2*Math.PI - result.h;
        }
        // finally the last component s
        result.s = 1-3*min(r,g,b);
    }
}
The skin color cluster in HSI space is simply:
H < 25 
H > 230

Thus, we can write skin color detection in HSI-space in Java like this:

public boolean isSkinHSI(double r, double g, double b) {
    HSI hsi = RGB2HSI(r,g,b);
    if (hsi.h<25||hsi.h>230) {
        return true;
    )
    return false;
}
All in one

We can now use all these methods combined to make as good as possible guess about pixels being part of skin or not. It is enough to load an image and make the test for each pixel.

The Java-function to be used to mark skin pixels with color red (0x00FF0000) with any sized BufferedImage could look like this:
public static BufferedImage detect(BufferedImage in) {
    BufferedImage out = new BufferedImage(in.getWidth(),in.getHeight(),BufferedImage.TYPE_INT_RGB);
    int red = 0x00FF0000;
    int[] pixels = new int[in.getWidth()*in.getHeight()];
    in.getRGB(0,0, in.getWidth(), in.getHeight(), pixels, 0, in.getWidth());
    for (int i=0;i<pixels.length;i++) {
        int c = pixels[i];
        int r = (c&0x00FF0000)>>16;
        int g = (c&0x0000FF00)>>8;
        int b = (c&0x000000FF)>>0;
        int a = 0;
        if (isSkinYCbCr(r,g,b)) {
            a+=1;
        }
        if (isSkinRGB(r, g, b)) {
            a+=1;
        }
        if (isSkinHSI(r, g, b)) {
            a+=1;
        }
        if (a==3) { // if all the methods respond "true", mark the pixel
            pixels[i]= red;
        }
    }
    out.setRGB(0,0, in.getWidth(), in.getHeight(), pixels, 0, in.getWidth());
    return out;
}    

Face detection

This algorithm can be used to detect face, or at least give quite good guess where the face could be, when attached to the image capturing software like in my post: Capturing webcam image with Java Media Framework.

References and further reading:
[1]
Jure Kovaˇc, Peter Peer, and Franc Solina
Human Skin Colour Clustering for Face Detection
http://www.lrv.fri.uni-lj.si/~peterp/publications/eurocon03.pdf

[2]
Vladimir Vezhnevets, Vasili Sazonov, Alla Andreeva 
A Survey on Pixel-Based Skin Color Detection Techniques
http://citeseerx.ist.psu.edu/viewdoc/download?doi=10.1.1.5.521&rep=rep1&type=pdf

[3]
Nusirwan Anwar bin Abdul Rahman, Kit Chong Wei and John See
RGB-H-CbCr Skin Colour Model for Human Face Detection
http://pesona.mmu.edu.my/~johnsee/research/papers/files/rgbhcbcr_m2usic06.pdf

[4]
Conversion from RGB to HSI
Ruye Wang
http://fourier.eng.hmc.edu/e161/lectures/color_processing/node3.html

[5] 
RGB to YCbCr 
http://www.fourcc.org/fccyvrgb.php